

Friday
Create a Christmas Star with Cold Porcelain
Wednesday
Make a Little CP Angel

Materials needed:
Cold Porcelain (white, flesh, pink or blue, hair color)
White glue
Styrofoam sphere for head
Clay tools
Paints & brush for face
Eye stickers (optional)
Round toothpicks for adding strength at joints
Friday
How to Make Pokemon Pichu

Wednesday
Make a Cyclamen Plant

Cold Porcelain Petunia

Step-by-step demonstration from Lydia to create some cold porcelain Petunias. Slideshow instructions are shown in multiple languages, just pause the video when it
A Couple of Cute & Stylized Cats
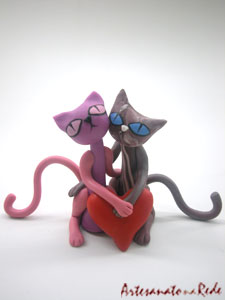
A cold porcelain tutorial from "Biscuit" magazine and the Brazilian site Artesanatonarede . Translated to English as best as possible. Two stylized cats hugging a heart and each other!
This is a good beginners project.
Sunday
Ideas for Coloring Cold Porcelain

The following videos demonstrate a few different ways to color your cold porcelain. The crafters in these videos are using markers, acrylic paints & make-up. You can also use oil paints, paste colorants (some made for cake decorating & some made specially for cold porcelain), pastel chalks and just about anything else that will transfer color!
Thursday
Step-by-Step: 8-Petal Flower

Tuesday
Make a Stuffed Bear Jar Topper

Cute stuffed teddy bear jar topper made from cold porcelain. Video narration is in Spanish but each step is clearly shown so it should be easy to follow even if you don't
Saturday
Flower Covered Jar

Select a short glass jar to decorate with cold porcelain following steps in this flower basket tutorial from Porcelana Fria magazine. This is a good beginners tutorial. Not many tools needed. Just shape the flowers and leaves using teardrop-shaped pieces of CP. When covering the bottom of jar, be careful not to cover the part where you screw the lid (so jar will still function)!
Make This Cute Pizza Man Figure

Make this cute pizza man as a free-standing figure or cake topper! Step-by-step instructions at Manualidades. If you need to translate the webpage try Google Translate.
Tuesday
Modeling a Walking Doll

This short video demonstrates how to make a simple body for a cold porcelain figure. It also shows how to make some easy shoes and how to create a walking pose.
Monday
Head Modeling Demo by Guilherme Pires

Thursday
How to Wrap a Styrofoam Cone with CP-Method 1

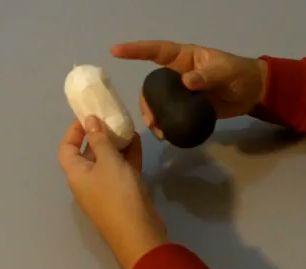
How to Wrap a Styrofoam Pear Shape with Cold Porcelain

Many air-dry clay projects call for Styrofoam shapes as armatures for figure modeling. We've featured a few different videos (see Labels "Styrofoam") showing the proper way to wrap a Styrofoam ball with cold porcelain (without getting cracks or trapped air). In this video, Marisol Romero shows us how to wrap a ball that includes extra cold porcelain at each end....making an oval shape from the round ball.
Pear shapes are often used to form torso of clay figure. Sometimes we need to model objects as oval or egg shapes. In these cases we use the technique of wrapping round ball and adding an extension. This technique is also important when modeling a lemon or character faces (with long muzzle), or the body of a duck or a goose or other critters with pear-shaped torsos.
http://porcelanafriapasoapaso.com/porcelana-fria-tecnica-de-forrado-de-esferas-con-prologacion/
Video narration is in Spanish, but even if you don't understand the language you should be able to follow along. Marisol clearly and carefully shows each step.
Video narration is in Spanish, but even if you don't understand the language you should be able to follow along. Marisol clearly and carefully shows each step.
Wednesday
How to Wrap a Foam Ball with CP
 |
| Large foam sphere used to make this character |
We've previously featured many videos from Marisol Romero showing the proper way to wrap Styrofoam shapes with cold porcelain (without getting cracks or trapped air)...but I forgot to include her instructions for the most basic of all shapes used as an armature with many air-dry clays....the Styrofoam ball!
Monday
How to Stretch and Flatten Cold Porcelain Paste

Cold porcelain and other air-dry clays can be flattened into thin sheets using a pasta machine
Saturday
How to Use CP to Wrap Two Foam Balls Together
Today we have another demonstration in a series of instructional videos from Marisol Romero about cold porcelain. Many air-dry clay projects call for Styrofoam shapes as armatures for figure modeling and sometimes, instead of a simple ball, you need a larger, oblong shape or double spheres. In the following video, Marisol shows how to tape 2 Styrofoam balls together and wrap both with cold porcelain (or other air-dry clay) and
Thursday
How to Wrap a Foam Ball with CP Extensions
 |
| Wrapped ball with double extensions |
Wednesday
How to Wrap a Styrofoam Half-Sphere With CP
 |
| Ladybug made with foam ball cut in half |
Make a Cute Cold Porcelain Car
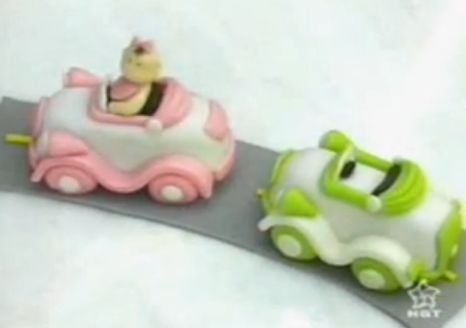
Create this cute little cold porcelain car and add a driver of your choice!
Narrator is speaking Portuguese in these videos, but each step is shown in detail (lots of close-ups) so it's easy to follow without translating. She seems to be using edible sugarcraft and cake in this demo, but the process is the same when using cold porcelain, just use something besides cake as the base!
Thursday
Marisol's Cold Porcelain Recipe
 |
| Stovetop Method |
Cold Porcelain is a "clay" or paste that can be made at home and is composed of white glue and cornstarch. Cold porcelain is known throughout the world by many different names. It is also known as porcelana fria, masa flexible, biscuit, pasta di mais, among others. It is soft, white and flexible and can be modeled into small figures or large. Hard and durable when cured.
Cold porcelain requires no baking to cure and air-dries at room temperature. As it dries, it will lose 15% to 20% of the original volume and this shrinkage must be considered when modeling.
Marisol Romero of Porcelana Fria Paso a Paso has created the following 2-part video demonstration showing her stovetop method for preparing the cold porcelain paste. There are many other recipes for cold porcelain, including microwave recipes. Which one to use depends on your own experience and what you will be making with the cold porcelain. Some recipes are softer, some harder, some more flexible or rigid. See our Recipes page for a few other recipes and try a few different ones to see which you are most comfortable with.
Happy St Patrick's Day


Saturday
How to Make an Elf Pendant

Today we have another excellent 3-part video demo from Marisol Romero, showing us, step-by step, how to make a friendly Elf pendant (or shelf sitter), using cold porcelain. Marisol is speaking Spanish in these 3 videos but, even if you don't understand what she is saying, you should be able to follow along easily. Every step is clearly shown.
Wednesday
Make This Cute Easter Bunny

Create a cold porcelain Easter bunny by following this 3-part, step-by-step tutorial from Karin at Artisan Life.
Note: Tutorial is in Portuguese If your browser doesn't automatically translate the page, try Google Translate. http://translate.google.com/
Monday
Cold porcelain recipe...only 3 ingredients!

I found a quick and easy cold porcelain recipe at the Deviant Art Forum, posted by beatus-vir. This is a microwave recipe and is made from just glue, cornrstarch & lemon. She also shows us how to add color to the cold porcelain paste using oil colors, pastel chalks, acrylic paints and watercolors.
Click here for recipe and mixing tutorial!
(Note: Tutorial is written in both Spanish and English. I feel pretty sure that where it says "white rubber", it really means "white vinyl glue" ....that's what happens when computers translate! LOL)
Saturday
Cute Mouse Video Demo

Here's an easy beginner's project...a cute little mouse demo from Giogio Arts!
Tuesday
Tutorial: Hearts & Roses Keepsake Box

Cover a heart-shaped box with clay roses and cording to create this pretty keepsake box. A nice place to keep all those love letters and Valentine's Day cards! ;-)
Tutorial was scanned from a Portuguese-language magazine and kindly translated to English by our friend Evelyne. Please visit her blog 'Sowl Mini'.
Materials needed:
Heart-shaped wood or mache box
Cold Porcelain tinted in colors for roses and cording
(Salmon, peach, pink, rose, crimson, etc)
Golden cord (soutache)
Clay roller or pasta machine
Clay Scissors
Leaf shape cutter (Kemper cutters)
Clay extruder

Friday
How to Sculpt a Rearing Horse or Unicorn

On his blog Chikim Art, Francisco de Assis shows us how to model this rearing horse using biscuit* (cold porcelain). Blog is written in Portuguese, however there is no need to translate. The horse tutorial is shown in step by step photos...no text. Leave off the saddle and bridle....add a horn....and you have a Unicorn!
*"Biscuit" is defined an unglazed form of porcelain or porcelain after the first firing and before glazing (aka "bisque")...but is also the term used in Brazil when describing (unfired) cold porcelain clay. Many other types of air-dry clay could also be used to create this horse.
Francisco says he's been modeling with biscuit for about 8 years and "the goal of this blog was to show to friends and family my pieces... today is something much broader with tips for beginners in the art of modeling."
This seemingly complicated sculpt begins with simple shapes as shown in the first few steps below. Give it a try!

Wednesday
Winnie the Pooh, Step by Step

Today we have another excellent video demo from Marisol Romero, showing us, step-by step, how to make Winnie the Pooh as shown above, using cold porcelain. Marisol is speaking Spanish in these 3 videos but, even if you don't understand what she is saying, you should be able to follow along easily. Every step is clearly shown.
Marisol currently has a contest to make this Winnie the Pooh in cold porcelain and win one of her premium cold porcelain how-to courses. Contest rules are explained on her website. Contest ends Feb.28, 2011.
Part 1 of 3
Part 2 of 3
Part 3 of 3
Sunday
We have a new name...which also means a new web address at Blogspot

Cold Porcelain Cuties
is now
Cold Porcelain Tutorials is being re-organized for 2011 and will contain a bunch of how-to tutorials for crafting and modeling with cold porcelain clay plus a collection of recipes for making cold porcelain paste at home.
From time to time, we'll also spotlight artists making some very cute dolls, animals and other cute figures! Cold Porcelain Tutorials will feature the same "cute" cold porcelain figures you've seen at Cold Porcelain Cuties but the new focus will be as a tutorial directory for a variety of cold porcelain projects..
A bit of re-organization will be happening all week long. Note that there is a new "category" listing in the sidebar. We hope this will help you find a specific tutorial subject easier. The former "tag cloud" is still available but has been moved to the footer. The "Tutorial Categories" are a condensed list of tutorial topics only. Use search tool for other topics.
If you have Cold Porcelain Cuties bookmarked and go to the old URL, you'll receive a message that the blog no longer exists! Not quite true! It's just been re-named, which means your old bookmarks won't work anymore! Please change bookmark to Cold Porcelain Tutorials. Sorry... I haven't figured out a way to make Blogger automatically forward the old bookmarks to the new name. The RSS Feed should still work....at least I hope so! Please let me know if you run into a problem! This whole "name change" thing has been an experiment with Blogger tools and I'm learning as I go! ;-)
Friday
How to Properly Wrap a Foam Cone with Clay

In our last post, we featured a video from Haydee Miranda demonstrating her method for wrapping a Styrofoam ball with cold porcelain. The foam ball is the most common armature used when making cute cold porcelain figures but the Styrofoam CONE is also used often. In the following video, Haydee Miranda demonstrates the proper way to wrap a Styrofoam cone with cold porcelain so you don't end up with cracks or trapped air. Note that the ball of clay she starts with is about equal to the circumference of the shape.
Spanish is the language spoken in this tutorial but I think you can easily follow what's she's doing even if you don't understand what she's saying!
Wednesday
How to Properly Cover a Foam Ball with Clay

Many air-dry clay projects call for Styrofoam shapes as armatures for figure modeling. Quite a few people have mentioned they are having trouble covering the foam with clay without getting cracks or trapped air. In the following video, Haydee Miranda demonstrates her method of wrapping a Styrofoam ball with cold porcelain.
Spanish is the language spoken in this tutorial but I think you can follow along even if you don't understand what she's saying!
Tuesday
Make This Cute Little Rascal

Make this cute little rascal in his overalls and ballcap following the steps in this cold porcelain tutorial. Tutorial was scanned from a Portuguese-language magazine and kindly translated to English by our friend Evelyne. Please visit her blog 'Sowl Mini'. Click images to view larger photos for each step.

Materials needed:
Cold porcelain (pre-tinted in colors needed)
Hot glue (or white glue, to adhere parts)
Scissors
Silicon mold (for head, optional)
Acrylic paint & paintbrushes (or paint markers)
Toothpicks (to strengthen joints)
Doll hair or brown macrame cord (unraveled to make hair)
Tiny wood buttons (optional)
Modeling tools (needle tool, roller and optional rolling stitch marker)
Wood base
Thursday
Make a Cute Elephant

In the following 2 videos, Sweet Cakes by Ronda shows us how to make a cute elephant. These demos are using gumpaste and fondant, but the process is exactly the same for cold porcelain....just use regular glue instead of "edible" glue!
Part 1
Part 2
Tuesday
How to Sculpt Doll Hands and Feet with CP

Bebidoll demonstrates modeling hands and feet for a doll made with cold porcelain.
In this second video, Bebidoll sculpts a dolls head with cold porcelain. She's using techniques more often seen with polymer clay than cold porcelain. Her doll's face has a more realistic look to it than the typical 'cute' face seen on cold porcelain dolls.
Friday
Make This Cute Dalmatian
 |
| Dalmatian Puppy This adorable creature can be a great gift or cake topper |
Would you like to make the Dalmatian dog shown in the header for Cold Porcelain Cuties? Simple, basic shapes are used to create this cute puppy with photos every step of the way to show you how.
Tutorial was translated to English from Porcelana Fria magazine and was written especially for cold porcelain paste. You could also try making the Dalmatian with other types of air-dry clay or make another kind of dog simply by changing the colors used. Enjoy!
Note: If you would like to make a slightly simpler dog, see this video demo of a little brown puppy.
Thursday
Another hair demonstration!

This video demo from Donna Lane will show you how she applies hair to her cute figures using a clay gun. This is actually a video demo for gumpaste, but the process is exactly the same for cold porcelain....just use regular glue where needed instead of "edible" glue!
This video stops suddenly before she adds the bangs to the hairdo. There's suppose to be a "Part 2" to this demo but I can't find it posted anywhere. I'll post this Part One for you because it seems to contain most of the demo. If you know where Part 2 is....please leave a comment and let us know!! ;-)
Wednesday
How to Model 'Stitch'

Cute Tanpopo shows us how she models the cartoon
character 'Stitch' with cold porcelain.
Tuesday

Friday
How to Make this Cute Gnome

This cute gnome tutorial was created by Leticia Suarez del Cerro for a Spanish-language website. Because of their Javascript-style slideshow, computer-assisted translation is difficult, so I've copied and translated it to English as best as I can. See original at http://www.utilisima.com/manualidades/5740
Cold porcelain
Styrofoam balls #2 and #3
Toothpicks (for reinforcement)
Paints or colorants for tinting:
raw sienna, black, burgundy, olive green, blue, ochre, fleshtone and white
Modeling tools
White glue
Thursday
How to Make a Cute Character Head

This video demo from Tammy's Cakes uses gumpaste and fondant to create the character, but the process is exactly the same for cold porcelain. Just use regular white glue instead of edible glue and paint or felt tip instead of edible ink!
Monday
Make a Cute Frog

Creating a frog cake topper with gumpaste artist Donna Lane.
This video demo is using gumpaste and fondant, but the process is exactly the same for cold porcelain....just use regular white glue instead of "edible" glue!
Thursday
How to Make Doll Hair with CP Paste

Two methods shown for creating hair for your cold porcelain dolls or figures. These video demos from Tammy's Cakes are using gumpaste and fondant, but the process is exactly the same for cold porcelain....just use regular glue instead of "edible" glue!
Part 1... Making hair without extruder
Part 2... Making hair WITH extruder
Subscribe to:
Posts (Atom)