

Showing posts with label step by step. Show all posts
Showing posts with label step by step. Show all posts


Sunday


Wednesday
Tulips Made with Cold Porcelain
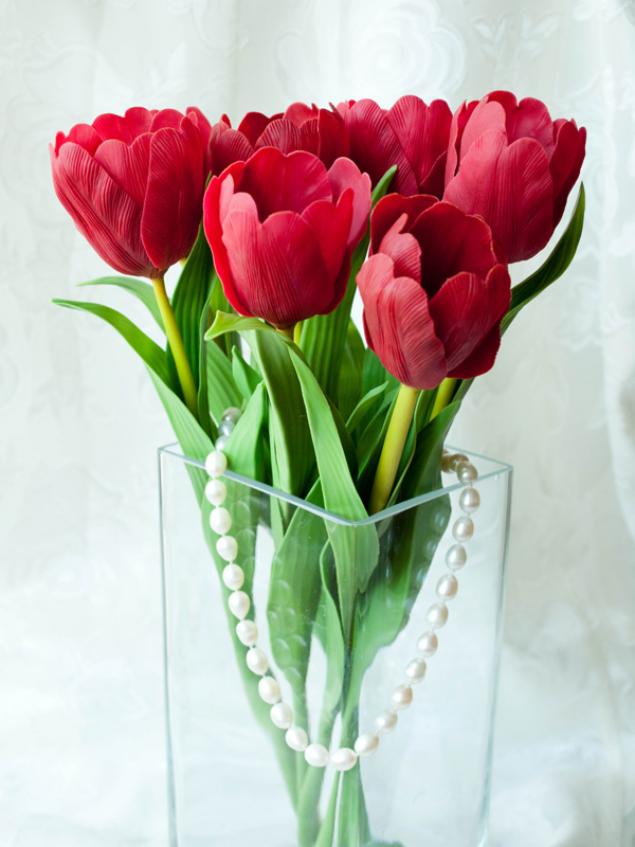
Create these realistic tulips with this tutorial from Russian artist Antonina Melnichenko. Antonina gives us some unique tips in this detailed, step-by-step photo tutorial, such as using a spoon to lay the petals in as they dry, assuring a cupped shape. She also collects real pollen to glue to her clay flowers!
Commercial cutters and veiners are used to cut both petals and leaves out of cold porcelain. You can make your own cutters or purchase an inexpensive set of flower cutters at Amazon (and other websites) such as the Wilton Gum Paste Flowers Set or one of the special tulip sets shown below that includes a cutter and veiner.
Saturday
Little Farmer step by step

This cold porcelain tutorial written by Fernanda Malzoni shows us how to create this cute "little farmer" figure step by step, with progress photos showing each step. This tutorial is in Spanish, use Google Translate to translate page if needed (or other online translator).
Sunday
Roses in Cold Porcelain by Tryny

Here's is another tutorial for making cold porcelain roses. This time Tryny Designs shows us her rose technique, step by step with lots of photos. With this method, the variegated shading of the petals is done after the flower has cured.
This tutorial is in Spanish, use Google Translate to translate page if needed (or other online translator).

Thursday
Sleepy Puppy

Cold Porcelain (about 1 lb...500 gr)
Polystyrene or Styrofoam spheres No 4 and No 5 (1 for body and 1 for head)
Acrylic or oil paint to pre-tint white clay: Raw Sienna and Burnt Sienna
Sculpting tool & clay roller
Vinyl or water-based glue
Eye stickers (or paint the eyes)
Blushing powder (pastels, scrapbooking powder or make-up)
Black permanent marker for "freckles"
Optional wood base
Optional wood base
Acrylic paints for the wood base: yellow and white
Acrylic paint to tint clay for "quilt buttons": blue
Tuesday
Make a Skinny Doll Ballerina

Create this cute ballerina skinny doll from cold porcelain following these instructions from Giselle of Gisarteira Atelier. Customize the doll to your own preference!
Step by step instructions (in English) follow the video (which is written in Portuguese).
Monday
Step by Step: Skinny Doll with Pink Dress

Wednesday
Make a Cyclamen Plant

A Couple of Cute & Stylized Cats
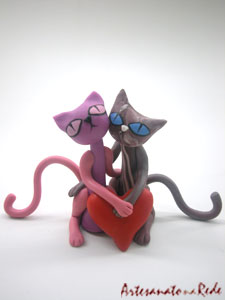
A cold porcelain tutorial from "Biscuit" magazine and the Brazilian site Artesanatonarede . Translated to English as best as possible. Two stylized cats hugging a heart and each other!
This is a good beginners project.
Thursday
Step-by-Step: 8-Petal Flower

Saturday
Flower Covered Jar

Select a short glass jar to decorate with cold porcelain following steps in this flower basket tutorial from Porcelana Fria magazine. This is a good beginners tutorial. Not many tools needed. Just shape the flowers and leaves using teardrop-shaped pieces of CP. When covering the bottom of jar, be careful not to cover the part where you screw the lid (so jar will still function)!
Make This Cute Pizza Man Figure

Make this cute pizza man as a free-standing figure or cake topper! Step-by-step instructions at Manualidades. If you need to translate the webpage try Google Translate.
Wednesday
Make This Cute Easter Bunny

Create a cold porcelain Easter bunny by following this 3-part, step-by-step tutorial from Karin at Artisan Life.
Note: Tutorial is in Portuguese If your browser doesn't automatically translate the page, try Google Translate. http://translate.google.com/
Monday
Cold porcelain recipe...only 3 ingredients!

I found a quick and easy cold porcelain recipe at the Deviant Art Forum, posted by beatus-vir. This is a microwave recipe and is made from just glue, cornrstarch & lemon. She also shows us how to add color to the cold porcelain paste using oil colors, pastel chalks, acrylic paints and watercolors.
Click here for recipe and mixing tutorial!
(Note: Tutorial is written in both Spanish and English. I feel pretty sure that where it says "white rubber", it really means "white vinyl glue" ....that's what happens when computers translate! LOL)
Tuesday
Tutorial: Hearts & Roses Keepsake Box

Cover a heart-shaped box with clay roses and cording to create this pretty keepsake box. A nice place to keep all those love letters and Valentine's Day cards! ;-)
Tutorial was scanned from a Portuguese-language magazine and kindly translated to English by our friend Evelyne. Please visit her blog 'Sowl Mini'.
Materials needed:
Heart-shaped wood or mache box
Cold Porcelain tinted in colors for roses and cording
(Salmon, peach, pink, rose, crimson, etc)
Golden cord (soutache)
Clay roller or pasta machine
Clay Scissors
Leaf shape cutter (Kemper cutters)
Clay extruder

Subscribe to:
Posts (Atom)